Find where a certificate is installed

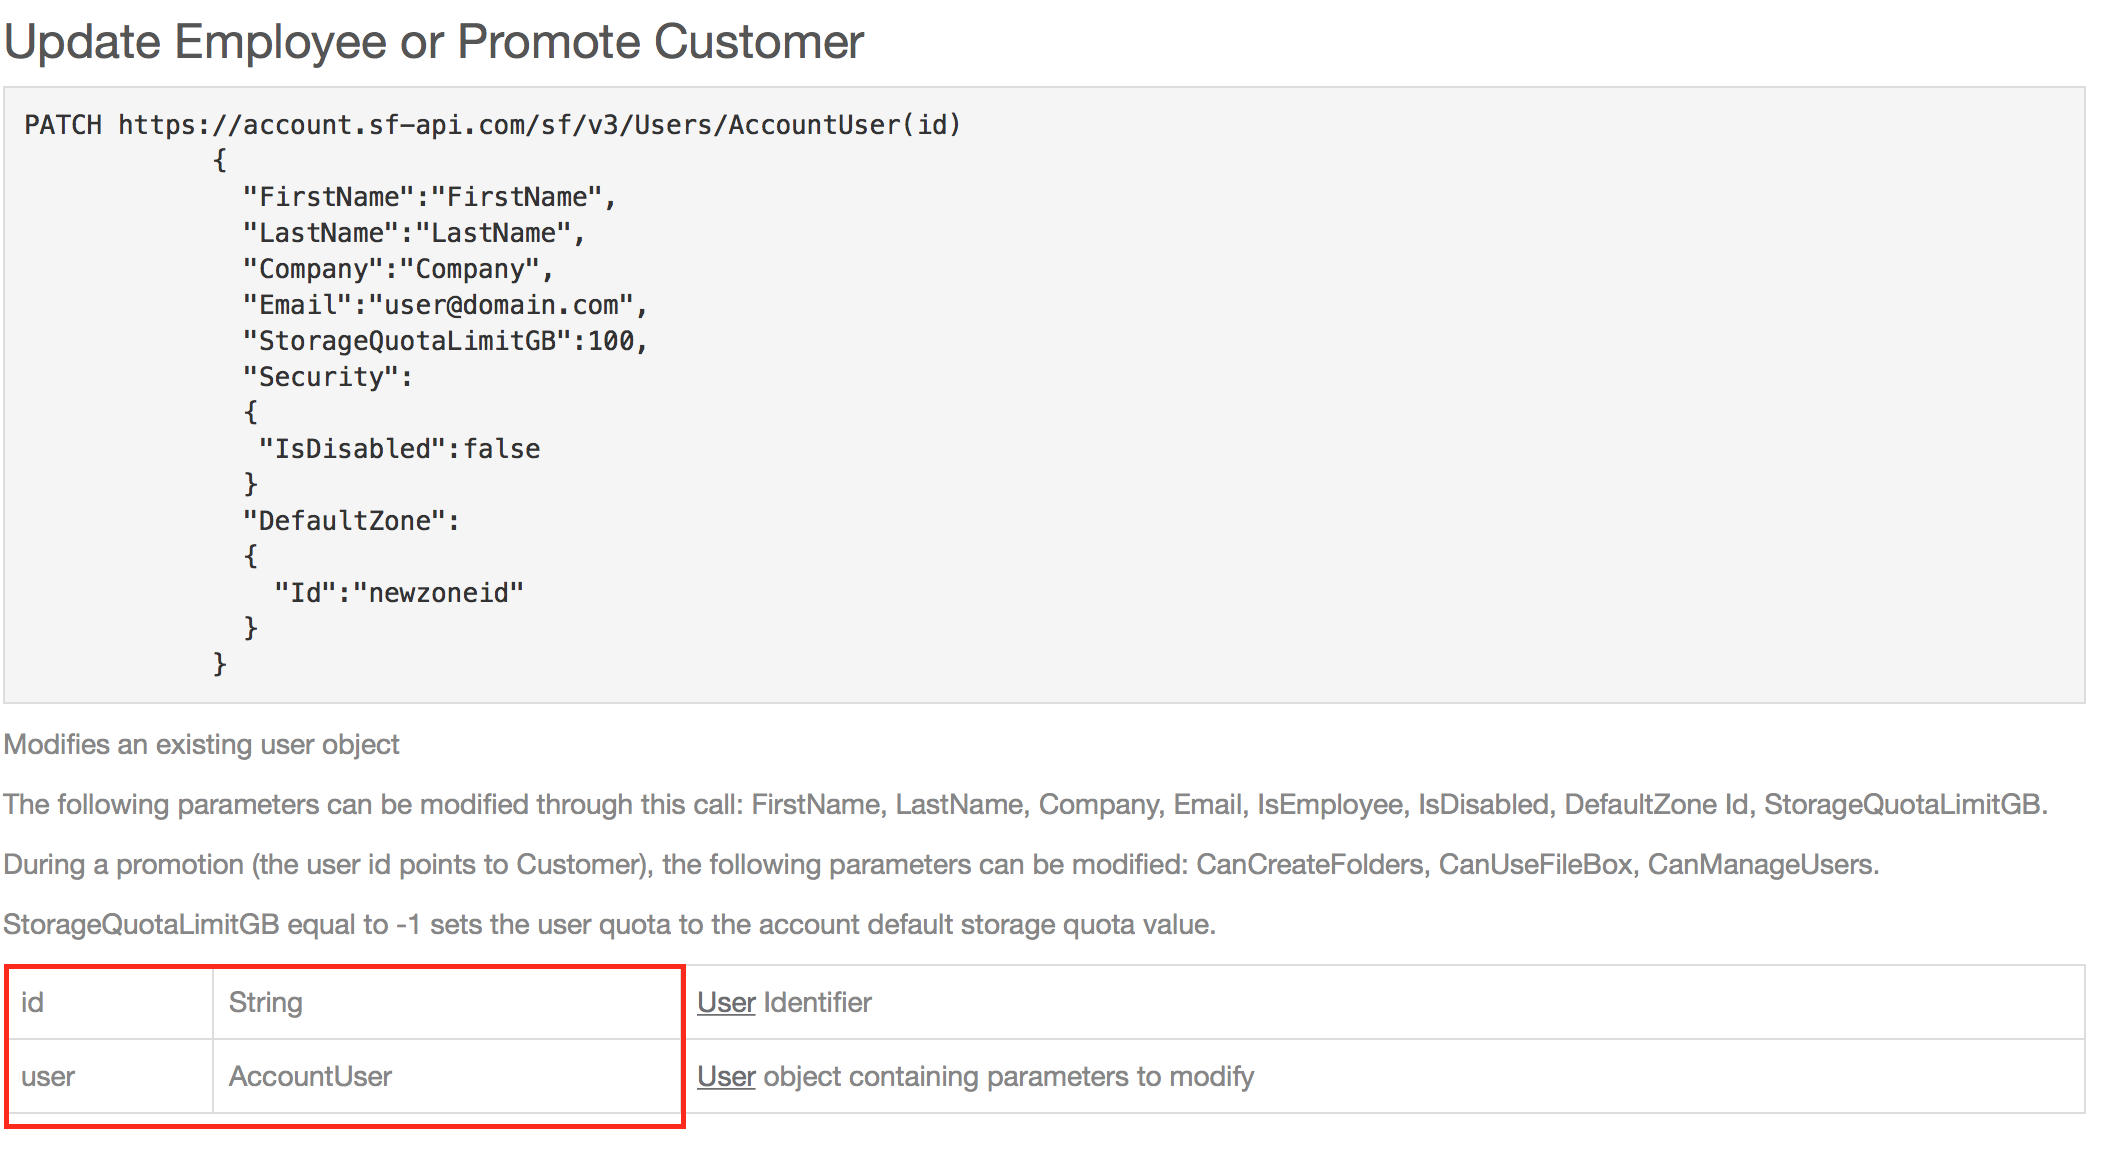
Some organizations use wildcard certificates. The problem with these certificates is that they start to lead a life on it’s own. So when the time comes that such a certificate is about to expire one can wonder where is this certificate installed? Luckily we have Powershell to save us from having to open all certificate stores on all servers in the domain. At first I was  thinking maybe the easiest way could be to have a Powershell remoting session. But that would require all servers to have Powershell remoting enabled. Unfortunately not all servers have it enabled or have a reasonable Powershell version to start with. So just for documenting purpose I’ll write down the command to find a certificate.

A certificate has a thumbprint. This thumbprint is equal on all servers as it part of the certificate, much like the serial number.  So you can easily find the thumbprint where your looking for running the command on a server where the certificate is present.

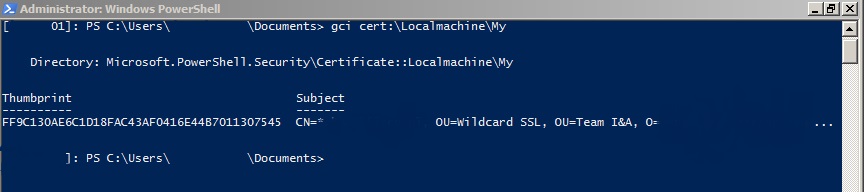
Just copy the thumbprint and enter it into the command to find the certificate like the on below

Invoke-Command {gci cert:\Localmachine\My | ? {$_.Thumbprint -eq "FF9C130AE6C1D18FAC43AF0416E44B7011307545"}} -ComputerName #COMPUTERNAME#

Replace #COMPUTERNAME#  for the computername you would want to question. Now this is all good but like I mentioned before I would want to find certificate regardless of Operation system contstrains or whether Powershell Remoting is enabled or not. So this script would process that accordingly. Change the thumbprint to the thumbprint of your certificate. The script export all servers where the certificate with the given thumbprint is present. Please feel free to modify this to your needs.

Function Get-Cert( $computer=$env:computername ){
    #Sets ReadOnly flag upon external Certificate store.
	$ro=[System.Security.Cryptography.X509Certificates.OpenFlags]"ReadOnly"
	#Opens LocalMachine store. You could potentially enter a different Cert store. 
	$lm=[System.Security.Cryptography.X509Certificates.StoreLocation]"LocalMachine"
	#Opens personal certificate store from local machine. 
	$store=new-object System.Security.Cryptography.X509Certificates.X509Store("\\$computer\My",$lm)
	#Establish connection with remote PC
    $store.Open($ro)

	#Display certificates in console or variable
	$store.Certificates

}

#Opens list
$Thumbprint = "FF9C130AE6C1D18FAC43AF0416E44B7011307545" 
$List = @()

#Servers reset their machine password within a specific timeframe
$Servers = Get-ADComputer -Filter * -Properties OperatingSystem,PasswordLastSet | ?{$_.OperatingSystem -match "Server" -and $_.PasswordLastSet -gt (Get-Date).AddDays(-60)}

Foreach ($Server in $Servers)
	{
	$Server.DNSHostName 
	If ((Get-Cert $Server.DNSHostname | ? {$_.Thumbprint -eq $Thumbprint}).Count -ne 0)
		{
		$List += $Server.DNSHostName
		}
	}

$List | % {AC -Value $_ -Path ".\ComputersWithCertificate.txt"}

Count homedirectories

For management purposes creating a report with the directory size of users’s home directory you can use this script. It will count the total size of the home directory per user. It will get the user’s name based on the name of the home directory. This wil be written down in the file.

$list = @(GCI "\\Fileserver\users$" -Force| ?{$_.PsIsContainer -eq $True})
$Header1 = ("DisplayName;Gebruikersnaam;Grootte in MB")
$Header2 = ("Hoofdmap;Grootte in MB")
$Path1 = ".\Overzicht-H-Schijven.csv"
AC -Value $Header1 -Path $Path1
$Path1 = GI $Path1


Foreach ($Item in $List)
{
$Result = @(GCI ($Item.FullName) -Recurse -Force)
[Int]$Count = 0
Foreach ($ResultItem in $Result){$Count = $Count + $ResultItem.Length / 1MB}
$Value = ((Get-ADUser $Item.Name).Name + ";" + $Item.Name+ ";" + $Count)
AC -Value $Value -Path $Path1
}

$Body = "Beste,

Hierbij het overzicht van de grootte van de H Schijven van de gebruikers van uw organisatie.

Groet,
"
$list = Import-CSV $Path1.FullName -Delimiter ";"
$list | % { $_."Grootte in MB" = [int]$_."Grootte in MB" }
$list = $list | Sort -Property Gebruikersnaam -Unique | Sort -Property "Grootte in MB" -Descending
$list | Export-CSV $Path1.FullName -Delimiter ";" -NoTypeInformation -Force

Send-MailMessage -From "servicedesk@company.nl" -Subject "Gebruiker overzicht " -To "emailadress@domain.tld" -Body $Body -SmtpServer "mailserver" -Attachments $Path1.FullName

RI $Path1 -Force

Connecting to Powershell Endpoints Exchange/Lync

I will write a short post about connecting to Powershell endpoints of Exchange and Lync. Basically you can always use PSRemoting to connect and make use of modules. However some CMDlets will simply not work when importing the snapin or module. So connecting to an endpoint is much more efficient. To connect to Microsoft Exchange use the following commands:

$PSOptions = New-PSSessionOption -SkipCACheck -SkipRevocationCheck -SkipCNCheck
$Session = New-PSSession -ConfigurationName Microsoft.Exchange -ConnectionUri https://ExchangeServer.Domain.TLD/powershell -SessionOption $PSOptions
Import-PSSession $Session 

To connect to Lync use the following commands:

$Session = New-PSSession  -ConnectionUri https://LyncServer.Domain.TLD/ocspowershell -Authentication NegotiateWithImplicitCredential
Import-PSSession $Session

You can connect from any domain computer. Of course if your loged on with an account that does not have to appropriate permission you’ll have to connect using the  -credentials parameter.


Modsecurity for Plesk 2

I already spend some attention on this subject. A customer complained that the webmail did not work no more. The user was able to logon but could not send an e-mail. Obviously this had something to do with Modsecurity. I’m running Plesk on a Ubuntu server. So enabling Modsecurity and enforcing this down on all customers is troublesome. But Plesk does not give you the option to enable or disable Modsecurity on “system” subdomains. Like for example webmail.domain.tld. So this causes an issue when Modsecurity is enabled system wide and webmail is needed. If you were to just read webmail and not answer everything will work just fine. There’re so many rules you’ll need to disable or exclude before it will run fine that it makes no sense to configure this. It’ll practically undermine the sole function of Modsecurity.

Plesk apparently  has a config file for each webmail subdomain. This file is located either here:

/etc/apache2/plesk.conf.d/webmails/roundcube/domain.tld_custom_webmail.conf

or here:

/etc/apache2/plesk.conf.d/webmails/horde/domain.tld__custom_webmail.conf

And now you’ll have to decide whether to exclude a great number of rules or to disabled Modsecurity completely.  If you want to disabled Modsecurity completely and want to enforce security by adding some security headers you can use the code below:

<IfModule mod_security2.c>
  SecRuleEngine Off
</IfModule>
Header always set Strict-Transport-Security "max-age=63072000; includeSubDomains; preload"
Header always set X-Content-Type-Options: nosniff
Header always set X-Frame-Options: SAMEORIGIN
Header always set X-XSS-Protection: "1; mode=block"
Header unset Content-Security-Policy
Header add Content-Security-Policy "default-src https: 'unsafe-inline' 'unsafe-eval';connect-src https: wss:"
Header always set Public-Key-Pins 'pin-sha256="2rpOTT3tKv5TF8/hZGAEvA5aJAwFrXSrEX404CzY9mM="; pin-sha256="gXyS+QHqbu4T0pNQLIgUX+WyMI3ndaViZacoqedaA/o="; max-age=2592000'
Header always edit Set-Cookie (.*) "$1; HTTPOnly; Secure"

If you want to disabled rules by ID (by url is impossible because that changes with every mail) you can use the code below:

<IfModule mod_security2.c>
SecRuleRemoveById 981319 960024 981231
</IfModule>
Header always set Strict-Transport-Security "max-age=63072000; includeSubDomains; preload"
Header always set X-Content-Type-Options: nosniff
Header always set X-Frame-Options: SAMEORIGIN
Header always set X-XSS-Protection: "1; mode=block"
Header unset Content-Security-Policy
Header add Content-Security-Policy "default-src https: 'unsafe-inline' 'unsafe-eval';connect-src https: wss:"
Header always set Public-Key-Pins 'pin-sha256="2rpOTT3tKv5TF8/hZGAEvA5aJAwFrXSrEX404CzY9mM="; pin-sha256="gXyS+QHqbu4T0pNQLIgUX+WyMI3ndaViZacoqedaA/o="; max-age=2592000'
Header always edit Set-Cookie (.*) "$1; HTTPOnly; Secure"

I guess to risk is somewhat moderate if you consider that anyone can send you a message with html content. But sometimes security is a notch below functionality.

Making exclusions is a very normal task when Modsecurity is enabled. So how do you do that? Well next to what’s shown above you’ll have the option to disable rules based on the request url. When using WordPress for example. Many thing do not work very well. This is especially when OWASP is enabled.  So to create some rules you’ll have to edit the config file below:

/etc/apache2/modsecurity.d/rules/modsecurity_crs-plesk/modsecurity_crs_15_custom.conf

If the file does not exist, create it. You can than append to file with the rules and URL that you can find when watching the log file. Enable Modsecurity first in report only. Than add the necessary rules and your site is much safer.

SecRule REQUEST_FILENAME "@streq /wp-admin/post.php" "id:88261001,phase:1,t:none,nolog,pass,ctl:ruleRemoveById=973332"
SecRule REQUEST_FILENAME "@streq /wp-admin/post.php" "id:88261002,phase:1,t:none,nolog,pass,ctl:ruleRemoveById=970903"
SecRule REQUEST_FILENAME "@streq /wp-admin/post.php" "id:88261003,phase:1,t:none,nolog,pass,ctl:ruleRemoveById=973344"
SecRule REQUEST_FILENAME "@streq /wp-admin/post.php" "id:88261004,phase:1,t:none,nolog,pass,ctl:ruleRemoveById=973333"
SecRule REQUEST_FILENAME "@streq /wp-admin/post.php" "id:88261005,phase:1,t:none,nolog,pass,ctl:ruleRemoveById=973306"
SecRule REQUEST_FILENAME "@streq /wp-admin/post.php" "id:88261006,phase:1,t:none,nolog,pass,ctl:ruleRemoveById=973304"
SecRule REQUEST_FILENAME "@streq /wp-admin/post.php" "id:88261007,phase:1,t:none,nolog,pass,ctl:ruleRemoveById=973300"
SecRule REQUEST_FILENAME "@streq /wp-admin/post.php" "id:88261008,phase:1,t:none,nolog,pass,ctl:ruleRemoveById=973338"
SecRule REQUEST_FILENAME "@streq /wp-admin/post.php" "id:88261009,phase:1,t:none,nolog,pass,ctl:ruleRemoveById=981243"
SecRule REQUEST_FILENAME "@streq /wp-admin/post.php" "id:88261010,phase:1,t:none,nolog,pass,ctl:ruleRemoveById=981245"
SecRule REQUEST_FILENAME "@streq /wp-admin/post.php" "id:88261011,phase:1,t:none,nolog,pass,ctl:ruleRemoveById=981317"
SecRule REQUEST_FILENAME "@streq /wp-admin/post.php" "id:88261012,phase:1,t:none,nolog,pass,ctl:ruleRemoveById=950901"
SecRule REQUEST_FILENAME "@streq /wp-admin/post.php" "id:88261013,phase:1,t:none,nolog,pass,ctl:ruleRemoveById=981231"
SecRule REQUEST_FILENAME "@streq /wp-admin/post.php" "id:88261014,phase:1,t:none,nolog,pass,ctl:ruleRemoveById=950120"
SecRule REQUEST_FILENAME "@streq /wp-admin/post.php" "id:88261015,phase:1,t:none,nolog,pass,ctl:ruleRemoveById=960024"


ShareFile edit Storage quota limit

I just wrote an opinion about the Powershell module of Citrix ShareFile. Now let’s get to it. This is the fun part. You’ll have to take a close look at how Citrix describes things. So if you want to manage the StorageQuotaLimitGB field using Powershell, you can use the script below. I’ll get in detail about it.

Add-PSSnapin ShareFile
$SFClient = Get-SfClient -Name File.sfps
$User = Send-SfRequest $SFClient -Method GET -Entity "Accounts\Employees" | ?{$_.Email -match "EmailAddress@Domain.TLD"}
$Property = new-object ShareFile.Api.Models.AccountUser
$NewQuota = ([int]$Quota = (Send-SfRequest $SFClient -Method GET -Entity "users" -Id $User.id).StorageQuotaLimitGB) + "5"
$Property.StorageQuotaLimitGB = $NewQuota
$Uri = $user.url.OriginalString.replace("Contacts","Users/AccountUser")
$Result = Send-SfRequest -Client $SFClient -Method Patch -Uri $Uri  -Body $property
If ($Result.StorageQuotaLimitGB -notmatch $NewQuota){Write-Error "Value is niet aangepast"}

This script will export all users and then select the user with the e-mailaddress specified. You can of course enter a string there with a specific value. Then it creates a new property with the value AccountUser. See it like this you want to edit this value but it is not in the Entity Users but one endpoint lower. It is in the entity AccountUser. AccountUser is below the entity User. If you for example would enter -Entity “Users”, the script will fail because the value StorageQuotaLimitGB is simply not present at that level. At first I got this wrong.  So that’s why you set this value lower. It is described on the site of Citrix but just a bit cryptic. Look for this part of the text:

StorageQuotaLimitGB

So then the script get the current limit and adds an additional 5 GB to that limit. This is caught in a integer. Than I get the URL. Please not that here in the EU we have a different link. This script is not impacted by that but this explanation is. ShareFile uses this link:

https://ShareFileDomainName.sf-api.eu/sf/v3/Users(ID)

Well if you use the Entity Users the link above will be used. As said above you’ll want to point to the endpoint AccountUser. So the script changes the current uri from contacts to this:

https://ShareFileDomainName.sf-api.eu/sf/v3/Users/AccountUser(ID)

That is the magic. Next the script sends a request to the REST API of ShareFile to apply the new StorageQuotaLimitGB. At last it checks if the change is actually applied. If it isn’t a error is written.

Powershell ShareFile

When a software developer introduces a Powershell module or snapin I’m always excited about it. So Citrix released a Powershell snapin for ShareFile. There are some good thing about it, some bad things and one ugly thing.

The bad

So Citrix says that the ShareFile module is without the guarantee that it’ll actually work. See it like a beta product. This directly indicates that you’ll find very few documentation about. But even more worrying is that you’re on your own because it is unsupported. Citrix released a Powershell version but at the same time there’s a C# and a Java module. They’ve build this on a REST API. This is beautiful because in a way you’re not really bound to the ShareFile modules. As long as you can talk to the REST API. The API is on version 3 so I think it’s pretty stable and should lose it “in development” state.  But the lack of good documentation and

The Ugly

Well first and foremost, an administrator can create a SFPS file. This file can be used to authenticate to the ShareFile REST API. So you can create a carefree file that could be used by a first in line administrator or a script. And so you don’t have to share the credentials.  By default there’s no expiration date. Meaning that if this file falls in the wrong hands, one can truly demolish your entire environment. A lazy administrator could potentially compromise his entire environment. Via Powershell you can actually get the files in the repository of a ShareFile User. This is a extreme risk of which many administrators are unaware.

The Good

Well there’s a lot good about this. In most cases if there’s a REST API, the GUI is build upon that. So anything you can do in the GUI, can be done using the API. This is an incredible feature set. You can completely manage your environment using the API. I created some scripts to manage the ShareFile API. Right now the community is rather small, but as soon as this grows I’m sure there’s going to be a large knowledge base where you can find help.

If you get the authentication right and the scripts ready I’m sure that this will ease the pressure of the back of the administrators. I’m quite positive anyway.

HPKP explained

The CA system we currently have is insecure. Governments try to hack CA’s, hacker try to hack CA’s, Criminals try to hack CA’s basically anyone tries to hack CA’s. So if one of these hackers succeed that person can issue a certificate that is valid for whatever domain he want. No browser or client will ever doubt that certificate as it is issued by a trusted CA. This occurred when a Dutch CA Diginotar was hacked. Hackers used that certificate for gmail and so forth.

In defence for this security issue a RFC was created. Here’s where HKPK (HTTP Public Key Pinning)  is introduced. This technique is quite simple. A pin can be generated with a certificate. This pin is always the same with that certificate. You’ll need to have 2 certificates per CN or SAN. So if you have a certificate from let’s say StartSSL for the domain www.example.com you’ll need an additional certificate for www.example.com or let’s say a wildcard certificate for *.example.com. Next you generate a pin for these certificates. You enter the pin into a HTTPS header and your secure.

When a clients connects to your site it saves this pin. Lets say a CA gets hacked and a certificate is generated for your domain. Then that hacker uses your certificate for example in a MITM attack of if it is a government it can alter DNS for your domein. Then the client connect to your site again and the certificate does not match the saved pin. The client browser present you with an error that someone is trying to intercept the traffic and further processing will be stopped.

For now only a maintained list by Google is being used for HKPK. On this list are only large sites like Facebook, Twitter and Google. But soon this RFC will be implemented and available for anyone who uses a SSL certificate. When HKPK is being used a hacker or government will have to burn a CA every time they try to intercept traffic. A very nice result. Yet in the world before HKPK we have more than 1500 certificates.

By the end of 2015 HKPK is already proven to be valuable. Only for google.com Symantec issued a certificate while Google did not request the certificate. Symantec fired those employees. But this must only be the tip of the iceberg. Image how much HKPK can contribute to a safer net. I can only imagine that some government already are deleting certificates

But what if the certificate expires? Well that one is easy. You have two certificates in the header. Than just use the not expired certificate. Request a new certificate generate the new pin. Enter this in the header and remove the old pin. The only thing important here is that you must use a shorter period than the time between the expiration of certificate1 and certificate2.

So how do you make this work? First you’ll need to generate a SHA256 pin. You can do this for an online certificate like this:

Non-SNI

openssl s_client -connect www.bexit.nl:443 | openssl x509 -pubkey -noout | openssl rsa -pubin -outform der | openssl dgst -sha256 -binary | openssl enc -base64

SNI

openssl s_client -servername www.bexit.nl -connect www.bexit.nl:443 | openssl x509 -pubkey -noout | openssl rsa -pubin -outform der | openssl dgst -sha256 -binary | openssl enc -base64

Or for a certificate by running this command

openssl x509 -in certificate.pem -pubkey -noout | openssl rsa -pubin -outform der | openssl dgst -sha256 -binary | openssl enc -base64

When you’ve generated the pins you can add them to the header by using a string like this:

Header always set Public-Key-Pins 'pin-sha256="hOKXjMHg/QuZ2q6n6Hzp6j+P+217O6Mzd70WJ2LgEBw="; pin-sha256="t3EN6WT7PvqYPL0af/BoG4YAjVucNaIhg+CkT/sDExM="; max-age=15768000'

Be careful not to enter a very long timeframe as you might run in to trouble later on.

Correct data in mobile field in AD

A script changed the format of values in the Mobile field in AD. This however caused errors in the operation of soft tokens. I made an export of all mobile phone numbers and noticed that there were more errors. As so I’ve made a script that uses the substring method to correct the values. Please feel free to change it as desired.

$List2 = @()
$List = Get-ADUser -Filter * -Properties Mobile | ?{$_.Mobile -ne $Null}
Foreach ($Item in $List)
	{
	If ($Item.Mobile.Substring(0,2) -notmatch "06" -or $Item.Mobile.Length -ne "10")
		{
		$List2 += $Item
		}
	}

Foreach ($Item in $List2)
	{
	If ($Item.Mobile.Substring(0,3) -match "316"){Set-ADUser -Identity $Item.sAMAccountName -MobilePhone ($item.mobile.Substring(0,3).Replace("316","06") + $Item.Mobile.Substring(3))}
	If ($Item.Mobile.Substring(0,1) -match "6"){Set-ADUser -Identity $Item.sAMAccountName -MobilePhone ($item.mobile.Substring(0,1).Replace("6","06") + $Item.Mobile.Substring(1))}
	If ($Item.Mobile.Substring(0,4) -match "\+316"){Set-ADUser -Identity $Item.sAMAccountName -MobilePhone ($item.mobile.Substring(0,4).Replace('+316',"06") + $Item.Mobile.Substring(4))}
	If ($Item.Mobile.Substring(0,5) -match "00316"){Set-ADUser -Identity $Item.sAMAccountName -MobilePhone ($item.mobile.Substring(0,5).Replace("00316","06") + $Item.Mobile.Substring(5))}	
	If ($Item.Mobile.Substring(0,3) -match "013"){Set-ADUser -Identity $Item.sAMAccountName -MobilePhone $Null}	
	If ($Item.Mobile -match " "){Set-ADUser -Identity $Item.sAMAccountName -MobilePhone ($Item.Mobile.Replace(" ",""))}
	If ($Item.Mobile -match "-"){Set-ADUser -Identity $Item.sAMAccountName -MobilePhone ($Item.Mobile.Replace("-",""))}
	If ($Item.Mobile -match "Geen"){Set-ADUser -Identity $Item.sAMAccountName -MobilePhone $Null}
	}

Query number of group memberships per user

There’re times when things don’t go your way. Recently I’ve had a migration where both the old and the new company drives were active. Since we use AGLP, each folder has at least double the amounts of groups. Considering that the old company drive is also active, double that amount and you’ll have yourself a issue where users are unable to log on. The max token size is limited to a maximum of 1015 group memberships. This includes the nested groups. Since I wanted to know how big this problem was I decided to create a script that outputs this data to a file. All you have to do is enter the distinguished name of the OU you want to do a search in or remove the searchbase parameter completely to run it for all users.

Ipmo ActiveDirectory
$List = Get-ADUser -SearchBase "OU=OUName,DC=DOMAIN,DC=LOCAL" -Filter * -Properties MemberOf
$List2 = @()
$Path = ".\GroupMembershipsPerUser.csv"
ForEach ($Item in $list)
	{
	$Result = @()
	ForEach ($Group in $Item.MemberOf)
		{
		$Result += $Group
		$GroupResult =@(Get-ADGroup $Group -Properties Memberof).Memberof
		$Result += $GroupResult
		$Temp = $GroupResult
		While ($Temp -ne $Null)
			{
			$Temp = @()
			Foreach ($Object in $Groupresult)
				{
				$Objectresult =@(Get-ADGroup $Object -Properties Memberof).Memberof
				If ($Objectresult -ne $Null)
					{
					$Temp += $Objectresult
					$Result += $ObjectResult
					}
				}
			If ($Temp.count -ne 0){$Groupresult = $Temp}
			}
		}
	$Result = $Result | Select -Unique
	$List2 += $Item.SAMAccountName	+ ";" + $Result.count
	Write-host $item.Name heeft $Result.count groepen -f Yellow -b DarkCyan
	}	
AC -Path $Path -Value "Username;Groups"
ForEach($Item in $List2)
		{
		AC -Path $Path -Value $Item
		}

Connecting to servers outside a domain using Powershell

From time to time you’ll find yourself running scripts to a server outside the domain. If you have the same credentials on that as on the domain there’s no problem. However in most cases you don’t. Normally you will have to encrypt the password as a secure string. However there are cases that such a solution costs to much time. Especially if you have multiple passwords for the same user account (eg. Administrator). So to get this done you might use a old trick to connect to the server using SMB en store the credentials session in the memory of the server running the script. I must admit that this is only if you’ll have to go quick and dirty. If’ve used it once and it may come in handy sometimes.

$Credentiallist = @()
$Credentiallist += "Password1"
$Credentiallist += "Password2"
$Credentiallist += "Password3"
$Credentiallist += "Password4"
$Errors = ".\Error.csv"
$Success = ".\Success.csv"
$net = new-object -ComObject WScript.Network
$ADComputers = Import-CSV ".\DNSNames.csv"
$Computers =@()
$ComputerSuccess =@()
$FailedComputers = @()
Foreach ($ADComputer in $AdComputers)
	{
	$ADComputer = $ADComputer.DNSHostName
	Foreach ($cred in $credentialList)
		{
		If ($ComputerSuccess -notcontains $ADComputer)
			{ 
			$net.MapNetworkDrive("u:", "\\$ADComputer\c$", $false, "localhost\Administrator", "$Cred")
			If((Test-Path "\\$ADComputer\C$\Windows" ) -eq $True)
				{
				$ComputerSuccess += $ADComputer
				#Do the code you want to run against the server
				}
			}
		}
	If ((get-psdrive -name "U" -Erroraction SilentlyContinue) -ne $null){$net.RemoveNetworkDrive("u:")}
	}