You can install a VPN Server on a Disk Station or Rack Station Synology NAS. When you configure a PPTP setting you can connect from any device without much configuration. However when you want a more secure solution you can choose for L2TP. When you open the correct ports on your router and Synology firewall you can connect from any iOS, Mac OS X, Android and even Windows Phone device. However Windows assumes that you always connect with a direct internet line (so without NAT) to a Internet Server (so without NAT). There is not other configuration. Now in my case I’m mostly behind a NAT device and my Synology most definitely is behind a NAT router. So you have to change some settings in the register and reboot before this works. Microsoft has made a KB for it. In this KB they refer only Vista and Server 2008 as being applicable. But Windows 7, 8, 8.1 , Server 2008 R2, Server 2012 and Server 2012 R2 are also affected. If you configure Windows as specified in the KB you can successfully connect to your Synology.
Category Archives: Overige
Back-up Databases in Plesk remotely
Some databases are more important then others. In some cases you want to back-up just a couple database more often. I have a Synology Diskstation DS413J at home. To have an off-site back-up for my most important databases is extremely important. Some database must be retained for seven years for tax services here in the Netherlands. That is why I made a little shell script which exports databases and then, ftp explicit SSL, transfer it to the NAS device. First get the server ready transfer files over FTP(e)S.
sudo apt-get install lftp
The above code installs a lftp client on the in this case Ubuntu machine.
Next create a dir in which you want to dump the sql files in. I consider that you use Plesk 9+. In my case the folder is called /dumps. Create two .sh files with the corresponding code:
run.sh
	date=$(date +%x)
	exportdir="/dumps"
	while read database; do
	  filename="$exportdir/$database-$date.sql"
	  mysqldump -uadmin -p`cat /etc/psa/.psa.shadow` $database > $filename
	done </root/databases.txt
	lftp -f /root/ftps.sh
ftps.sh
debug 10
set ftp:ssl-auth TLS
set ssl:verify-certificate no
set ftp:ssl-protect-data yes
open USER:PASSWORD@SERVER.TLD:21/DATADIRECTORY
mput /dumps/*
close
In databases.txt you list the databases that will be back-upped. The FTPS script copies any file in the Dump directory.
Then make a cron job which runs this task.
Dump database in Plesk Linux
To dump the content of a MySQL database in an .sql file you can run the following code:
mysqldump -uadmin -p`cat /etc/psa/.psa.shadow` DATABASENAME > FILE_NAME.sql
You can copy that code to the spool to automate this process.
Citrix Config export script
Create Tax report of OrangeHRM with Powershell
This code is only usefull if there is only one employee.
Export four seperate CSV files out of the database of OrangeHRM. The tables you should export are the following:
ohrm_customer
ohrm_project
ohrm_project_acitivity
ohrm_timesheet_item
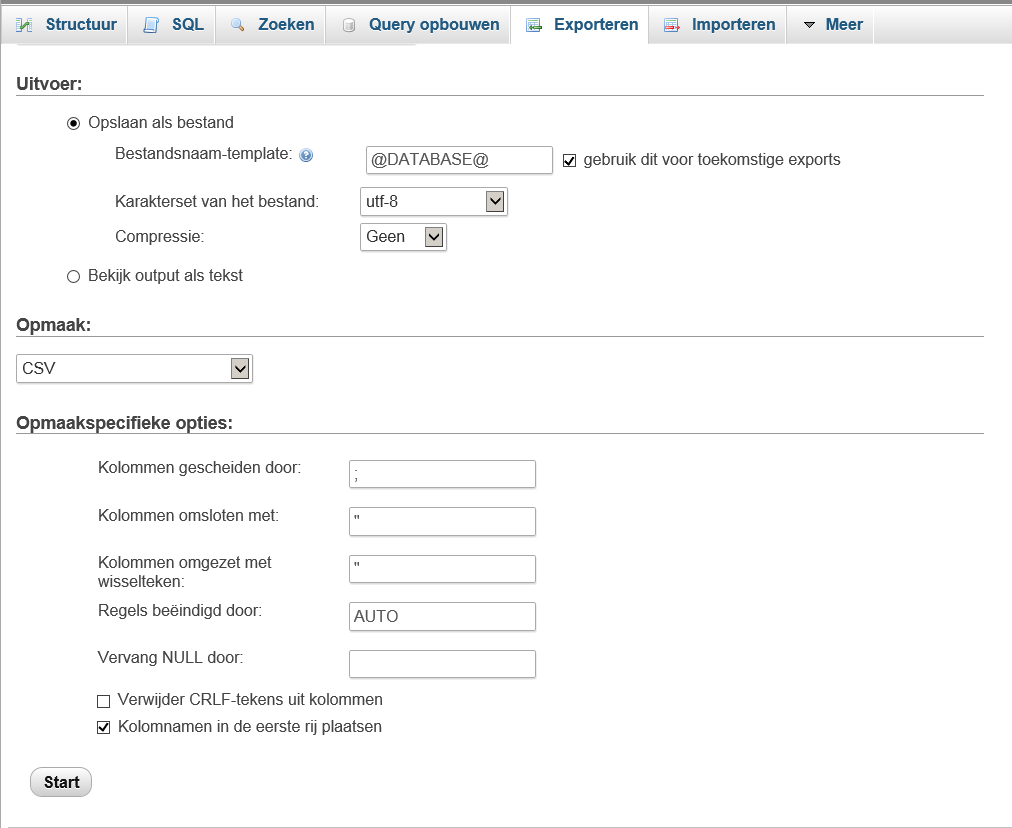
You should use the following settings for the export ni PHPMyAdmin:
Export each table with the following names:
ohrm_customer – Customers.csv
ohrm_project – Projects.csv
ohrm_project_acitivity – Activities.csv
ohrm_timesheet_item – Items.csv
Place the CSV files and the script below in the same directory.
$Activities = import-csv ".\Activities.csv" -Delimiter ";"
$Customers = import-csv ".\Customers.csv" -Delimiter ";"
$Items = import-csv ".\Items.csv" -Delimiter ";"
$Projects = import-csv ".\Projects.csv" -Delimiter ";"
$Export = @()
Foreach ($item in $Projects){[int]$count = $item.customer_id
$count--
$item.customer_id = $Customers[$count].name
}
Foreach ($item in $items){
[int]$count = $item.Activity_id
$count--
$item.Activity_id = $Activities[$count].name

[int]$count = $item.project_id
$count--
$item.Employee_id = $Projects[$count].customer_id
[int]$count = $item.project_id
$count--
$item.project_id = $Projects[$count].name
}
$items | Export-CSV -path ".\Export.csv" -Delimiter ";"
This will export a CSV file in the same directory. The only thing you have to do now is replace the header of employee_id to something more meaningful. In fact you will probably have to replace all the headers to something a bit more meaning full.
Ripe ip-adres opzoeken
Citrix Access Gateway Netscaler HTTP to HTTPS redirect
Om bij een Netscaler een redirect in te stellen van http naar https moet het volgende commando opgegeven worden:
add lb vserver IPADDRESShttp_redirect HTTP IPADDRESS 80 -redirectURL "https://cag.domain.nl"
De virtual server wordt dan bij de load balance feature weergegeven als down. Dit maakt niet uit want het werkt wel op deze wijze. Let erop dat de LB functie wel eerst ingeschakeld moet zijn.