Tag Archives: Ubuntu

Modsecurity for Plesk 2

I already spend some attention on this subject. A customer complained that the webmail did not work no more. The user was able to logon but could not send an e-mail. Obviously this had something to do with Modsecurity. I’m running Plesk on a Ubuntu server. So enabling Modsecurity and enforcing this down on all customers is troublesome. But Plesk does not give you the option to enable or disable Modsecurity on “system” subdomains. Like for example webmail.domain.tld. So this causes an issue when Modsecurity is enabled system wide and webmail is needed. If you were to just read webmail and not answer everything will work just fine. There’re so many rules you’ll need to disable or exclude before it will run fine that it makes no sense to configure this. It’ll practically undermine the sole function of Modsecurity.

Plesk apparently  has a config file for each webmail subdomain. This file is located either here:

/etc/apache2/plesk.conf.d/webmails/roundcube/domain.tld_custom_webmail.conf

or here:

/etc/apache2/plesk.conf.d/webmails/horde/domain.tld__custom_webmail.conf

And now you’ll have to decide whether to exclude a great number of rules or to disabled Modsecurity completely.  If you want to disabled Modsecurity completely and want to enforce security by adding some security headers you can use the code below:

<IfModule mod_security2.c>
  SecRuleEngine Off
</IfModule>
Header always set Strict-Transport-Security "max-age=63072000; includeSubDomains; preload"
Header always set X-Content-Type-Options: nosniff
Header always set X-Frame-Options: SAMEORIGIN
Header always set X-XSS-Protection: "1; mode=block"
Header unset Content-Security-Policy
Header add Content-Security-Policy "default-src https: 'unsafe-inline' 'unsafe-eval';connect-src https: wss:"
Header always set Public-Key-Pins 'pin-sha256="2rpOTT3tKv5TF8/hZGAEvA5aJAwFrXSrEX404CzY9mM="; pin-sha256="gXyS+QHqbu4T0pNQLIgUX+WyMI3ndaViZacoqedaA/o="; max-age=2592000'
Header always edit Set-Cookie (.*) "$1; HTTPOnly; Secure"

If you want to disabled rules by ID (by url is impossible because that changes with every mail) you can use the code below:

<IfModule mod_security2.c>
SecRuleRemoveById 981319 960024 981231
</IfModule>
Header always set Strict-Transport-Security "max-age=63072000; includeSubDomains; preload"
Header always set X-Content-Type-Options: nosniff
Header always set X-Frame-Options: SAMEORIGIN
Header always set X-XSS-Protection: "1; mode=block"
Header unset Content-Security-Policy
Header add Content-Security-Policy "default-src https: 'unsafe-inline' 'unsafe-eval';connect-src https: wss:"
Header always set Public-Key-Pins 'pin-sha256="2rpOTT3tKv5TF8/hZGAEvA5aJAwFrXSrEX404CzY9mM="; pin-sha256="gXyS+QHqbu4T0pNQLIgUX+WyMI3ndaViZacoqedaA/o="; max-age=2592000'
Header always edit Set-Cookie (.*) "$1; HTTPOnly; Secure"

I guess to risk is somewhat moderate if you consider that anyone can send you a message with html content. But sometimes security is a notch below functionality.

Making exclusions is a very normal task when Modsecurity is enabled. So how do you do that? Well next to what’s shown above you’ll have the option to disable rules based on the request url. When using WordPress for example. Many thing do not work very well. This is especially when OWASP is enabled.  So to create some rules you’ll have to edit the config file below:

/etc/apache2/modsecurity.d/rules/modsecurity_crs-plesk/modsecurity_crs_15_custom.conf

If the file does not exist, create it. You can than append to file with the rules and URL that you can find when watching the log file. Enable Modsecurity first in report only. Than add the necessary rules and your site is much safer.

SecRule REQUEST_FILENAME "@streq /wp-admin/post.php" "id:88261001,phase:1,t:none,nolog,pass,ctl:ruleRemoveById=973332"
SecRule REQUEST_FILENAME "@streq /wp-admin/post.php" "id:88261002,phase:1,t:none,nolog,pass,ctl:ruleRemoveById=970903"
SecRule REQUEST_FILENAME "@streq /wp-admin/post.php" "id:88261003,phase:1,t:none,nolog,pass,ctl:ruleRemoveById=973344"
SecRule REQUEST_FILENAME "@streq /wp-admin/post.php" "id:88261004,phase:1,t:none,nolog,pass,ctl:ruleRemoveById=973333"
SecRule REQUEST_FILENAME "@streq /wp-admin/post.php" "id:88261005,phase:1,t:none,nolog,pass,ctl:ruleRemoveById=973306"
SecRule REQUEST_FILENAME "@streq /wp-admin/post.php" "id:88261006,phase:1,t:none,nolog,pass,ctl:ruleRemoveById=973304"
SecRule REQUEST_FILENAME "@streq /wp-admin/post.php" "id:88261007,phase:1,t:none,nolog,pass,ctl:ruleRemoveById=973300"
SecRule REQUEST_FILENAME "@streq /wp-admin/post.php" "id:88261008,phase:1,t:none,nolog,pass,ctl:ruleRemoveById=973338"
SecRule REQUEST_FILENAME "@streq /wp-admin/post.php" "id:88261009,phase:1,t:none,nolog,pass,ctl:ruleRemoveById=981243"
SecRule REQUEST_FILENAME "@streq /wp-admin/post.php" "id:88261010,phase:1,t:none,nolog,pass,ctl:ruleRemoveById=981245"
SecRule REQUEST_FILENAME "@streq /wp-admin/post.php" "id:88261011,phase:1,t:none,nolog,pass,ctl:ruleRemoveById=981317"
SecRule REQUEST_FILENAME "@streq /wp-admin/post.php" "id:88261012,phase:1,t:none,nolog,pass,ctl:ruleRemoveById=950901"
SecRule REQUEST_FILENAME "@streq /wp-admin/post.php" "id:88261013,phase:1,t:none,nolog,pass,ctl:ruleRemoveById=981231"
SecRule REQUEST_FILENAME "@streq /wp-admin/post.php" "id:88261014,phase:1,t:none,nolog,pass,ctl:ruleRemoveById=950120"
SecRule REQUEST_FILENAME "@streq /wp-admin/post.php" "id:88261015,phase:1,t:none,nolog,pass,ctl:ruleRemoveById=960024"


HPKP explained

The CA system we currently have is insecure. Governments try to hack CA’s, hacker try to hack CA’s, Criminals try to hack CA’s basically anyone tries to hack CA’s. So if one of these hackers succeed that person can issue a certificate that is valid for whatever domain he want. No browser or client will ever doubt that certificate as it is issued by a trusted CA. This occurred when a Dutch CA Diginotar was hacked. Hackers used that certificate for gmail and so forth.

In defence for this security issue a RFC was created. Here’s where HKPK (HTTP Public Key Pinning)  is introduced. This technique is quite simple. A pin can be generated with a certificate. This pin is always the same with that certificate. You’ll need to have 2 certificates per CN or SAN. So if you have a certificate from let’s say StartSSL for the domain www.example.com you’ll need an additional certificate for www.example.com or let’s say a wildcard certificate for *.example.com. Next you generate a pin for these certificates. You enter the pin into a HTTPS header and your secure.

When a clients connects to your site it saves this pin. Lets say a CA gets hacked and a certificate is generated for your domain. Then that hacker uses your certificate for example in a MITM attack of if it is a government it can alter DNS for your domein. Then the client connect to your site again and the certificate does not match the saved pin. The client browser present you with an error that someone is trying to intercept the traffic and further processing will be stopped.

For now only a maintained list by Google is being used for HKPK. On this list are only large sites like Facebook, Twitter and Google. But soon this RFC will be implemented and available for anyone who uses a SSL certificate. When HKPK is being used a hacker or government will have to burn a CA every time they try to intercept traffic. A very nice result. Yet in the world before HKPK we have more than 1500 certificates.

By the end of 2015 HKPK is already proven to be valuable. Only for google.com Symantec issued a certificate while Google did not request the certificate. Symantec fired those employees. But this must only be the tip of the iceberg. Image how much HKPK can contribute to a safer net. I can only imagine that some government already are deleting certificates

But what if the certificate expires? Well that one is easy. You have two certificates in the header. Than just use the not expired certificate. Request a new certificate generate the new pin. Enter this in the header and remove the old pin. The only thing important here is that you must use a shorter period than the time between the expiration of certificate1 and certificate2.

So how do you make this work? First you’ll need to generate a SHA256 pin. You can do this for an online certificate like this:

Non-SNI

openssl s_client -connect www.bexit.nl:443 | openssl x509 -pubkey -noout | openssl rsa -pubin -outform der | openssl dgst -sha256 -binary | openssl enc -base64

SNI

openssl s_client -servername www.bexit.nl -connect www.bexit.nl:443 | openssl x509 -pubkey -noout | openssl rsa -pubin -outform der | openssl dgst -sha256 -binary | openssl enc -base64

Or for a certificate by running this command

openssl x509 -in certificate.pem -pubkey -noout | openssl rsa -pubin -outform der | openssl dgst -sha256 -binary | openssl enc -base64

When you’ve generated the pins you can add them to the header by using a string like this:

Header always set Public-Key-Pins 'pin-sha256="hOKXjMHg/QuZ2q6n6Hzp6j+P+217O6Mzd70WJ2LgEBw="; pin-sha256="t3EN6WT7PvqYPL0af/BoG4YAjVucNaIhg+CkT/sDExM="; max-age=15768000'

Be careful not to enter a very long timeframe as you might run in to trouble later on.

Problem with Zen Photo

A webhosting client reported that he wasn’t able to connect to the admin area of Zen Photo.  My web service uses Plesk. His previous webhosting was under Cpanel. I first uploaded the setup files of his version of Zen Photo. Then I asked him to perform the update. This failed by an internal server error (500). The first thing I did at that point was looking through the logfiles. The log contain the following errors

mod_fcgid: stderr: PHP Warning: file_exists(): open_basedir restriction in effect. File(/var/lib/php5) is not within the allowed path(s):

To resolve this I added the path /var/lib/php5 to the allowed list. This is a slight security risk. Most binaries are located in the allowed list anyways so I added the configuration like below:

Screen Shot 2015-04-04 at 16.34.17

After this configuration change the users was able to connect to the admin area and also capable of upgrading Zen photo to the last stable built.

However quite soon after that the user started to report another problem. When he was browsing through the admin area he experienced internal server errors again. I started to look at the log files for that user and the following error was reported:

[core:error] [pid 5159] [client x.x.x.x:49520] End of script output before headers: admin-options.php, referer: 
[fcgid:warn] [pid 5159] (104)Connection reset by peer: [client x.x.x.x:49520] mod_fcgid: error reading data from FastCGI server, referer

The log reported this error from many different reference scripts. Mostly any reference script. By then I tried many things from disabling the XSS protection. Disabling HSTS, Disabling PHP modules and changing the file and folder permissions. I started looking at the error log of apache2 server located in /var/log/apache2/error.log. The following error caught my eye:

[fcgid:error] [pid 1886] mod_fcgid: process /var/www/cgi-bin/cgi_wrapper/cgi_wrapper(7917) exit(communication error), get unexpected signal 11
[fcgid:error] [pid 1886] mod_fcgid: process /var/www/cgi-bin/cgi_wrapper/cgi_wrapper(8193) exit(communication error), get unexpected signal 11

The first thing I thought was that the account of that user did not have enough permissions over the wrapper script. But that was not the case. So at that point I was able to rule out the web server and any file permissions. I somehow got the idea that this error must have had something to do with the difference in it’s PHP version between mine server at the one of the previous hoster. So I had an older server with PHP 5.3 installed. I migrated the account of that customer to that older server and let him recheck. The user reported no issue at all. PHP 5.3 uses xcache and PHP 5.5 uses the newer opcache as Zend extension. So what I did was changing an PHP configuration file (/etc/php5/apache2/conf.d/05-opcache.ini) from this:

; configuration for php ZendOpcache module
; priority=05
zend_extension=opcache.so

into this

; configuration for php ZendOpcache module
; priority=05
#zend_extension=opcache.so

I restarted the web server and have the customer look again. He did not find any issues. Of course this causes many issues on the server. I quickly reverted the file to the previous version.

Ultimately resolving this issue I did the following to his PHP configuration:

Screen Shot 2015-04-04 at 16.53.12


opcache.enable=0


I am so happy with Plesk and all it does to make my life easier.

Test TLS version on SMTP

My server had some issues sending mail in a secure manner. Somehow that SASL Authentication failed. After this was fixed I wanted to determine what TLS version and ciphers were used. After some time searching the web for an online tool that would do the job for me I thought about an OpenSSL parameter that could do the job for me. Run the following command:

openssl s_client -connect somedomain.tld:25 -starttls smtp

Of course it should represent the content of the MX record for that domain. In my case the following output was what I wanted to know:

New, TLSv1/SSLv3, Cipher is ECDHE-RSA-AES256-GCM-SHA384
Server public key is 2048 bit
Secure Renegotiation IS supported
Compression: NONE
Expansion: NONE
SSL-Session:
    Protocol  : TLSv1.2
    Cipher    : ECDHE-RSA-AES256-GCM-SHA384


Good luck!

Strict security for Plesk mail services

Plesk 12 comes with support voor Dovecot Secure IMAP server. This is a great improvement on the Courier IMAP server. I personally prefer Postfix for SMTP. You can configure Postfix in a very secure manner. In this post I will discuss how to configure Dovecot and Postfix and to configure Roundcube webmail for additional support.

Dovecot
Dovecot supports IMAP4 and POP3. I decided to disable POP3 as it is inferior to IMAP4. If you do want POP3 enabled you should alter the configuration. I disallowed a number of insecure ciphers. I disabled plaintext authentication as it is highly insecure. Note that even though you client is using SSL you can still be vulnerable to attack if Plain text authentication is enabled. Next I changed to directory for the certificate.

First install Dovecot if you haven’t done so. Establish a SSH connection to the server en vi the file:

/etc/dovecot/conf.d/01-servername.conf

01 makes it the last applied file. Adjust the content to your liking:

protocols = imap
ssl_cipher_list = EECDH+ECDSA+AESGCM:EECDH+aRSA+AESGCM:EECDH+ECDSA+SHA384:EECDH+ECDSA+SHA256:EECDH+aRSA+SHA384:EECDH+aRSA+SHA256:EECDH+aRSA+RC4:EECDH:EDH+aRSA:!aNULL:!eNULL:!LOW:!3DES:!MD5:!EXP:!PSK:!SRP:!DSS:!RC4
ssl_prefer_server_ciphers = yes
disable_plaintext_auth = yes
ssl_cert = </etc/dovecot/private/certificate.pem
ssl_key = </etc/dovecot/private/key.pem

This configuration encrypts IMAP4 traffic, disabled plain text authentication and enables a verifiable certificate. It diables a number of insecure ciphers and prefers better ciphers.

Postfix
Postfix is used by a massive amount of mail servers. Postfix by default is not configured in a safe manner. To enable Postfix to contact the rest of the world in a safe way you should enable certain ciphers. Furthermore you shouldn’t configure your Postfix server with EDH Ephemeral Diffie–Hellman. Most servers don’t support it yet which would lead to undeliverable mails. Instead use the Diffie-Hellman key exchange. You first need to create a 512 bit key exchange parameter file and a 1024 bit key exchange parameter file. Please note that a larger key length will result in a serious CPU penalty. To generate the files enter the commands below.

openssl gendh -out /etc/postfix/dh_512.pem -2 512
openssl gendh -out /etc/postfix/dh_1024.pem -2 1024

Next configure Postfix’s main.cf file:

vi /etc/postfix/main.cf

Remove the conflicting lines and add the lines below:

# TLS parameters
smtpd_tls_cert_file = /etc/postfix/certificate_2014.pem
smtpd_tls_key_file = $smtpd_tls_cert_file
smtpd_tls_dh1024_param_file = /etc/postfix/dh_1024.pem
smtpd_tls_dh512_param_file = /etc/postfix/dh_512.pem
smtpd_tls_eecdh_grade = strong
smtpd_tls_protocols= !SSLv2, !SSLv3
smtpd_tls_mandatory_protocols= !SSLv2, !SSLv3
smtpd_tls_security_level=encrypt
smtpd_tls_mandatory_ciphers = high
tls_preempt_cipherlist = yes
smtpd_tls_mandatory_exclude_ciphers = aNULL, MD5 , DES, ADH, RC4, PSD, SRP, 3DES, eNULL
smtp_tls_security_level = may

This will not be the most secure configuration. But please keep in mind that enforcing very high security standards will come at a high price.

Roundcube
When you altered the configuration above you need to restart the service of Postfix and Dovecot:

/etc/init.d/postfix restart
/etc/init.d/dovecot restart

When that is done your default Roundcube won’t work no more. This can be fixed by doing the following:

vi /usr/share/psa-roundcube/config/defaults.inc.php

Change the following values:

// IMAP
// ----------------------------------

// The mail host chosen to perform the log-in.
// Leave blank to show a textbox at login, give a list of hosts
// to display a pulldown menu or set one host as string.
// To use SSL/TLS connection, enter hostname with prefix ssl:// or tls://
// Supported replacement variables:
// %n - hostname ($_SERVER['SERVER_NAME'])
// %t - hostname without the first part
// %d - domain (http hostname $_SERVER['HTTP_HOST'] without the first part)
// %s - domain name after the '@' from e-mail address provided at login screen
// For example %n = mail.domain.tld, %t = domain.tld
// WARNING: After hostname change update of mail_host column in users table is
//          required to match old user data records with the new host.
$config['default_host'] = 'ssl://hostname.TLD';
@include "/etc/psa-webmail/roundcube/mailhosts.php";

// TCP port used for IMAP connections
$config['default_port'] = 993;

// IMAP AUTH type (DIGEST-MD5, CRAM-MD5, LOGIN, PLAIN or null to use
// best server supported one)
$config['imap_auth_type'] = DIGEST-MD5;


// ----------------------------------
// SMTP
// ----------------------------------

// SMTP server host (for sending mails).
// To use SSL/TLS connection, enter hostname with prefix ssl:// or tls://
// If left blank, the PHP mail() function is used
// Supported replacement variables:
// %h - user's IMAP hostname
// %n - hostname ($_SERVER['SERVER_NAME'])
// %t - hostname without the first part
// %d - domain (http hostname $_SERVER['HTTP_HOST'] without the first part)
// %z - IMAP domain (IMAP hostname without the first part)
// For example %n = mail.domain.tld, %t = domain.tld
$config['smtp_server'] = 'tls://hostname.tld';

// SMTP port (default is 25; use 587 for STARTTLS or 465 for the
// deprecated SSL over SMTP (aka SMTPS))
$config['smtp_port'] = 587;

This will restore the Roundcube functionality.

Mod Security for Plesk

One thing that I have learned is that no security measure is solid other than a computer without any ports, no screen and no NIC. If you want to have a connection to the internet you will be exposed to a massive amount of attacks. Therefore it is more important to detect attacks other then desperately trying to avoid vulnerability. You should be well protected but noticing that you have been hacked is just as important.

Plesk 12 has a nice addition as it comes to security. I’ve talked about security in this and this post. Now I will continue with some nice features of Plesk 12.

Modsecurity

If you upgraded your version of Plesk from 11.5, Mod Security will probably be optional. Mod Security is an application firewall that detects malicious code and prevent it from being ran. If you want this protection enable and install Mod Security. You’ll have three options: Disabled, Detect and Prevent.

Disabled needs no explanation

Detect Only will log any detected incident.

Prevent will actively try to prevent code from being run. It has impact on performance so be sure that you’ll enable it only if you server can handle it. You can tweak the settings so that there is a fast check if you have a lot of visitors. If you however want a thorough scan you can select that also.

Mod security works with a set of rules. This ruleset is updated regularly. By default the set of rules present in Plesk is a simple. This makes the effectiveness a little less but  performance is maintained and security is improved over having no mod security. If want a very secure environment you can select to OWASP core set. This is a more thorough set but none the less a very good protection. You can optionally pay for a subscription for a professional service. Use this only if the basic ruleset is not good enough for you.

It is wise to update the ruleset once a day. I often see new updates and 0-day vulnerabilities will be patched quicker. The impact of the update process is small and the gain in security is high.

Fail2Ban

When you have a small server like me, with only a few site and look at the logs, you see a lot malicious traffic. All sorts of port scanning, robots, crawlers and hackers. This traffic only increases on server with a high user load. There are lists of username, password combination that bots are trying at any site. If you have an account on a hacked site and your username and password combination is exposed you do not want this to actually be exploited. Let alone your users. Not all companies disclose security incidents which makes it hard to know if your credentials are on some list. If you don’t have a unique set of username/password combination for every site that risk is real.

Plesk 12 has this incredible feature call Fail2Ban. This extension automatically bans these threats by IP-address. The default settings are very loose but this can be improved.  Fail2Ban can built jails to detect login attempts and so forth. First install this feature and see my config below.

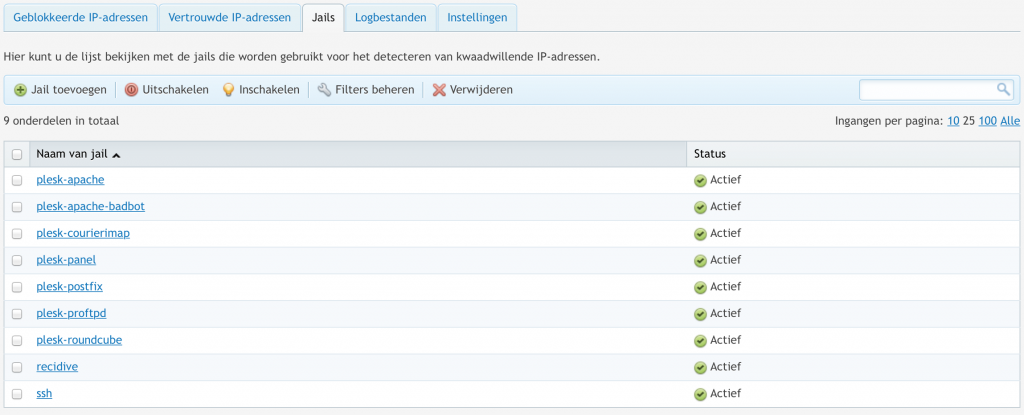
First you’ll have to enable jails. Jails are no more than automatically looking at logs. The logs are scanned and if an IP-address attempts multiple malicious actions in a certain period, that IP gets blocked. I would recommend to enable jails on all available services:

Jails Fail2Ban

Apache jails will check of failed authentication or time traveling. Badbot detects fraudulent bots. You can check what a jail does by looking at the Filters tab.

By default Fail2Ban will detect 7 attempts within 10 minutes and then bans that ip for a period of 15 minutes. I personally think that a 15 minute break is way to weak. Also the 10 minute range is to short. Will users will keep on trying to logon after 7 attempts? They will contact you anyway to reset their passwords. So releasing their IP is then just part of the deal. As I basically work alone on this server I lowered the number of failures. Next I have expanded the time frame in which to look for a attempt to 900 seconds. The ban time should be at least a year. Imagine that those bots are built to try every 10 minutes with 7 login attempts. That will be 144 times 7 login attempts a day. That will be a 367.920 attempts a year when with my settings you’ll only have a small number of no more than 5. Imagine that such a organization has 10 ip-addresses. That is a massive number of attempts without you probably ever noticing one of them if you do not look at the logs. That’s why I configured a ban period of  31536000 seconds. That is precisely one year. Even for a server that has only been up for one week there are already 10 ip-addresses banned. That is a quite large attack surface been taken care of. You can configure a ban period that is there forever to make it negative. So if you configure a ban period of -1 seconds the IP address will not be released.

Of course this impacts performance. You’ll have to decide for yourself if this is worth it for you. In my case it is. But I do not host any high profile sites.

There is another downside for the implementation of Fail2Ban in Plesk. If you whitelist an IP-Address that has been blocked all blocked IP-Addresses will be released. Furthermore if you restart your server the blacklist will be release also.

WordPress toolkit

You may have noticed the new WordPress toolkit icon in the Plesk Admin panel:

Wordpres Toolkit


This is a vital new function of Plesk 12. Security flaws in common web application can be exploited because they are not patched. With WordPress Toolkit you can update version of WordPress. You can also update plugins and themes. But it doesn’t stop there. You can also enhance security by removing the built numbers from all relevant files. You can tighten security on the wp-include and wp-content directories. The attack surface will be tremendously reduced. And the best thing is that you can see all installations even though you did not install them using Plesk. Having said that you can thus manage all your WordPress installation in one console. It is an incredible powerful addition and I wouldn’t want to miss it again.

Strict security on a Plesk Apache web server 2

In an addition to my previous post I would like to add a few updates and improvements.

HSTS

While it is possible to add a line in the conf file. You can also use a nifty function in Plesk. Since Plesk 11.5  configuring the web server per site is possible. But before I take you to heaven I would like to add a few side notes. Be sure that if you use the includesubdomains flag, that all your subdomains support HTTPS. You can of course configure this per site, but if a browser connects to the parent site and receives the HSTS header, it will automatically connect for a long time to all subdomain using HTTPS. If one of your subdomain doesn’t support HTTPS and the user visited the parent site you’ll have a problem. You can of course exclude the IncludeSubDomains flag.

When logging in the Plesk Panel site you can configure the webserver. Go to Websites and Domains en click on Expand. Next click on configure webserver.

Schermafbeelding 2014-10-01 om 11.18.55


Scroll down to the end of the page and add the following line in the HTTPS settings:

Schermafbeelding 2014-10-01 om 11.22.50

Please mind the includeSubDomains switch

Header always set Strict-Transport-Security "max-age=63072000; includeSubDomains"

CSP

I recently learned about CSP. This make it impossible to have malicious  XSS or other code being run from your site. For example if you have a script that is being referred to in the index of you site, it is harder to exploit the trust that you browser has in your site. You can very basically configure this using the same steps as above by adding another line in you HTTPS config


Header unset Content-Security-Policy
Header add Content-Security-Policy "default-src https: 'unsafe-inline' 'unsafe-eval';connect-src https: wss:"

Please note that this is a very basic way to configure CSP. To further tighten CSP you can read this site. To enable full CSP you can replace about code with:

Header unset Content-Security-Policy
Header add Content-Security-Policy "default-src 'self'"

Additional headers

Other headers that can strengthen the security are:

Header always set X-Content-Type-Options: nosniff
Header always set X-Frame-Options: deny
Header always set X-XSS-Protection: "1; mode=block"

Please note that these headers may alter you website functionality. For example X-Frame-Options: limits frame redering. So if you have code that runs in a frame, there will be no output. My advise is to play around with these headers in your test environment. Above headers may be also used in HTTP. So you can add them to the HTTP headers. This is unlike HTST which of course has something to do with secure transfer.

You configure them in the same way as the headers above:

Schermafbeelding 2014-10-01 om 11.43.50

In my next post I will get into HTTP Public Key Pinning. This I still have to figure out myself so if I have some spare time I will test around a little bit. The support for this feature isn’t very broad. Only predefined list are currently supported. As always IE doesn’t support it yet. Firefox supports it since version 32. Chrome supports it since 2011. However there is no mainstream support for it as of now. HPKP will however be supported in the future so I want to be sure that by the time it is supported, I already comply 🙂

The complete header looks like this:

Certificates decode and some details

So I was reading a wonderful book about SSL and TLS. It is really interesting. For a customer I requested my first SHA256 certificate back in december 2012. My first SHA256 certificate have been issued on february 2013. Now I wanted to request a SHA384 certificate which of course belongs to the SHA2 family. The thing is that I saw various CA changing their chain for SHA1 to SHA384 or from SHA256 tot SHA384. An example is Comodo (which is now in the process of reverting to SHA256). I created a CSR which had the algorithm sha384WithRSAEncryption. I have send the certificate to StartSSL an got back a SHA256 certificate. Now nothing  is wrong with that as probably most browsers do not even support SHA384 at the moment of writing. However I do wanted to spend some attention to this. To check what kind of algorithm your certificate have you can run the following code:

openssl x509 -in Certificatefile.cert  -text


To check what kind of algorithm your CSR has you can run the following code:

openssl req -in blabla.csr -text


Strict security on a Plesk Apache web server

There is an update for this post

To ensure secure SSL traffic you should always protect you server properly. Plesk isn’t really the best solution to handle such tasks. I found a way to protect a Plesk server better using SSL. My configuration is a Ubuntu 14.04 LTS server in combination with Plesk 12. If you have Ubuntu 12.04 LTS you’ll have problem protecting such a server. I’ll discuss this later on.

What you first need to do is to ensure that only secure ciphers are being used. A secure cipher is one that enables Forward Secrecy. If someone captured SSL traffic and succeeds to brute force it’s way into one package, he cannot use that key to decipher all the other packages. In other words if someone cracks open one package he would have to do the same thing for each package. If you use ciphers that don not  enable forward secrecy and someone cracks open one package he can open all the packages. Which makes it highly insecure.

Create a file on the following location:

/etc/apache2/conf-enabled/zz050-psa-disable-weak-ssl-ciphers.conf

Enter the text below to disable the unwanted ciphers. Please note that by disabling SSLv3 your IE6 users will not be able to connect anymore.

SSLProtocol all -SSLv2 -SSLv3
SSLHonorCipherOrder on
SSLCipherSuite "EECDH+ECDSA+AESGCM EECDH+aRSA+AESGCM EECDH+ECDSA+SHA384 EECDH+ECDSA+SHA256 EECDH+aRSA+SHA384 EECDH+aRSA+SHA256 EECDH+aRSA+RC4 EECDH EDH+aRSA RC4 !aNULL !eNULL !LOW !3DES !MD5 !EXP !PSK !SRP !DSS"

Please also note that you need to have Apache 2.3 for the EECDH algorithm. Apache 2.3 is not by default installed on Ubuntu 12.04 LTS. So I would recommend to install Ubuntu 14.04 LTS on you server or any other distribution with Apache 2.4 support.

Next you should enable OCSP stapling. This is a lot quicker to check for revocations than CRL. If your server handles a lot of traffic I would definitely  enabled this feature. Open the file:

/etc/apache2/conf-enabled/security.conf

And append the following text:

SSLUseStapling on
SSLStaplingResponderTimeout 5
SSLStaplingReturnResponderErrors off
SSLCACertificateFile /etc/ssl/certs/StartCom_Certification_Authority.pem
SSLStaplingCache shmcb:/var/run/ocsp(128000)

I only use one CA. If you have more than one CA your at the moment limited to only enter one. OCSP Stapling doesn’t support more than one CA. There is a new standard that will get rid of this problem. It is however not very well supported. Both clients and servers do rarely support it. You’ll have to wait for a bit.

Next you can enable HSTS (HTTP Strict Transport Security). This only work with Apache 2.2.3 and above. The way Plesk handles website isn’t really efficient for HSTS. Don’t get me wrong I absolutely love the way Plesk handles SNI and other offloading  and features but this is one that could be improved. You have to open each conf file for a website in Plesk.

Please note the update stated above!

First I’ll explain what HSTS is.  Imagine that you site enables HTTP requests and HTTPS requests. You have HTTP enabled to redirect to HTTPS. One of you users browses to you site and fails to directly go to secure site. Someone have created a fraudulent access point and redirects the site to another site. The user doesn’t mind the changes and enters his credentials. Well that account is compromised. Now HSTS tells the browser to connect to the https:// site for the upcoming year. Each time the user browses to that site the timer wil be reset to another year for that date.

Each new website gets a .conf file in the system directory. You will have to make sure that a certain text is added to that file.

If you have a default website for an IP address a file is created like to one below:

/var/www/vhosts/system/domain.tld/conf/httpd_ip_default.conf

If you use SNI Plesk creates the file below for you:

/var/www/vhosts/system/domain.tld/conf/httpd.conf

In the portion of the container below add the following line


<VirtualHost x.x.x.x:443 >

</VirtualHost>
Header always set Strict-Transport-Security "max-age=63072000; includeSubDomains"

This enables HSTS. But please not any change to you website settings and this file get overwritten. I created a shell script that checks the existence of the text and if it is not enabled it will enable it for you. I post that later on.

Back-up Databases in Plesk remotely

Some databases are more important then others. In some cases you want to back-up just a couple database more often. I have a Synology Diskstation DS413J at home. To have an off-site back-up for my most important databases is extremely important.  Some database must be retained for seven years for tax services here in the Netherlands. That is why I made a little shell script which exports databases and then, ftp explicit SSL, transfer it to the NAS device. First get the server ready transfer files over FTP(e)S.

sudo apt-get install lftp

The above code installs a lftp client on the in this case Ubuntu machine.

Next create a dir in which you want to dump the sql files in. I consider that you use Plesk 9+. In my case the folder is called /dumps. Create two .sh files with the corresponding code:

run.sh

	date=$(date +%x)
	exportdir="/dumps"
	while read database; do
	  filename="$exportdir/$database-$date.sql"
	  mysqldump -uadmin -p`cat /etc/psa/.psa.shadow` $database > $filename
	done </root/databases.txt
	lftp -f /root/ftps.sh

ftps.sh

debug 10
set ftp:ssl-auth TLS
set ssl:verify-certificate no
set ftp:ssl-protect-data yes
open USER:PASSWORD@SERVER.TLD:21/DATADIRECTORY
mput /dumps/*
close

In databases.txt you list the databases that will be back-upped. The FTPS script copies any file in the Dump directory.

Then make a cron job which runs this task.